
Ever Wish You Could Turn the Same Light On and Off From Two Different Places?
You’re heading upstairs with a snack in one hand and your phone in the other. You flip the hallway light on at the bottom, climb the stairs, and—boom—hit a switch at the top to turn it off. Magic, right?
That’s 3 way switch electrical wiring in action. No magic wand needed. Just some smart wiring.
Table of Contents
What Is a 3 Way Switch?
Okay, picture a regular light switch. It’s like a see-saw—flip it up, light goes on; flip it down, light goes off. A 3 way switch? That’s more like a tag team of switches.
Here’s the cool part:
- You can control one light from two different places.
- Perfect for stairs, long hallways, or big rooms with two entrances.
It’s kind of like having a TV remote in both your living room and bedroom. Control, from wherever you are.
How Does 3 Way Switch Electrical Wiring Actually Work?
Let’s simplify the brain-bending.
You’ve got:
- Two switches
- One light
- Some clever wiring that makes it all connect
Basic Components:
| Part | What It Does |
|---|---|
| Switch 1 & Switch 2 | These are the two wall switches |
| Traveler Wires | Carry current between switches |
| Common Wire | Connects to the power source (hot wire) or the light |
| Ground Wire | Safety first – for grounding the switch boxes |
Think of the traveler wires like secret passageways between two castles (your switches). Depending on how each switch is flipped, the current finds a path to the light—or not.
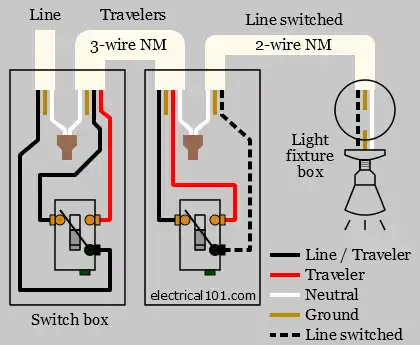
A Simple 3 Way Switch Electrical Wiring Setup
Here’s a straightforward version:
- Power enters at Switch 1.
- Traveler wires connect Switch 1 to Switch 2.
- Switch 2 connects to the light fixture.
- Flip either switch, and the light toggles—on or off.
Diagram Snapshot
- Power ➡️ Switch 1 ➡️ (Traveler wires) ➡️ Switch 2 ➡️ Light Fixture
- Ground wires connect throughout for safety.
Quick Safety Note (Because We Care)
Before touching any electrical wiring, ALWAYS:
- Turn off the power at the breaker box.
- Use a voltage tester to double-check.
- If you’re unsure, call a licensed electrician.
Electricity doesn’t mess around—and neither should you.
Tools You’ll Need for a DIY Install
Grab these before you dive in:
- Flat-head and Phillips screwdrivers
- Wire stripper
- Voltage tester
- Electrical tape
- Needle-nose pliers
- Wire nuts (connectors)
Optional: A headlamp, so you’re not in the dark—literally.
Step-by-Step: Installing a 3 Way Switch
- Turn Off the Power – Always first!
- Install Switch 1
- Connect the common wire to the black screw.
- Connect two traveler wires to the brass screws.
- Attach the ground wire.
- Run Traveler Cables
- From Switch 1 to Switch 2.
- Install Switch 2
- Repeat wiring: traveler wires to brass screws, common to black, ground attached.
- Connect to the Light Fixture
- The common wire from Switch 2 connects to the light.
- Test It Out
- Turn the power back on.
- Flip one switch… then the other. Voila!
When Should You Use a 3 Way Switch?
These are game changers in:
- Staircases
- Long hallways
- Garages
- Large bedrooms with dual entrances
Basically, anywhere you don’t want to hike across the room just to flip a switch.
Common Mistakes to Avoid
- Mixing up the traveler and common wires – That’ll cause funky switch behavior.
- Skipping the ground wire – Not safe.
- Forgetting to label wires during removal – You’ll thank yourself later if you label them before replacing an old switch.
Quick Refresher Table
| Task | Watch Out For |
|---|---|
| Turning off power | Do it at the breaker, not just the wall switch |
| Traveler wires | Make sure they’re in the right spots |
| Testing your work | Check both switches before celebrating 🎉 |
❓FAQs About 3 Way Switch Electrical Wiring
Q1: Can I install a 3 way switch myself?
Yes, if you’re comfortable with basic wiring and follow safety protocols. If not, call a pro.
Q2: How can I tell if I have a 3 way switch?
Look for two switches controlling the same light. Also, check for three terminals on the switch.
Q3: Do smart switches work with 3 way wiring?
Yes! Many smart switches are designed for 3 way setups, just check compatibility.
Q4: Why doesn’t my 3 way switch work?
It’s usually miswired. Double-check the common and traveler wire connections.
Q5: Can I convert a regular switch to a 3 way?
Yep! You’ll need to run traveler wires between two switch locations and possibly rework some connections.
Q6: Is there a 4 way switch?
Yes! It lets you control one light from three or more locations using additional intermediate switches.
You’ve Got This!
3 way switch electrical wiring might sound complicated at first, but once you break it down, it’s like piecing together a puzzle. It’s all about creating a pathway that lets electricity flow, stop, and reroute—depending on how the switches are flipped.
So whether you’re installing new switches or just trying to understand how they work, you now have the power (pun intended!).
Next step?
Walk around your home and see where a 3 way switch could make life easier. Then decide: DIY adventure or call in the pros?
Need professional help? Prime Electric is the best electrician in Sacramento, contact us for all your electrical needs. We got you!